


E-commerce businesses basically thrive in today’s mobile world. The numbers showcasing the grand scope of online shopping are shockingly high. According to projections, 2.14 billion people will make some sort of an online purchase during the year 2021.1 That’s nearly one-third of Earth’s current population. So, in a market so crowded with both buyers and sellers, e-commerce business owners need to focus on how they present their products to their customers.
Because without providing their customers with a seamless shopping experience, businesses can’t differentiate themselves from their competitors. According to research done by Microsoft, 58% of buyers stop doing business with a brand just because of poor customer experience.2
When a user visits a website or an app to buy something, there are probably a couple of options or alternatives to choose from. Different retailers may sell the same product; different brands may have similar products etc. Other than the product’s price, the product image is the first thing that gives an idea about the item customers are looking for and the buyer selling the item. The overall quality of the product image will instantly give away your professionality and high efforts to present your product in its best shape and form. But what makes a product image successful, or which pictures make buyers inclined to at least check out a product? Here are no code e-commerce app builder Mowico’s tips on how you can improve your e-commerce photography to get that competitive edge on social media and online shops.
Preparation Phase
Before starting to shoot the photographs you are going to use, you will need some time to prepare for the photo shoot for an entirely smooth process. This phase is crucial for any kind of photography, not only for e-commerce product photoshoots, since it helps you overview the process beforehand. Firstly, depending on the item you’re going to shoot, you will need to ready the product for the photo shoot. For example, if it’s a clothing item, make sure that it’s perfectly clean and ironed; if it’s a technological device, check for any scratches, dents or screen smudges. Generally, act like you prepare your products to display on your store shelves and ensure that items you are going to shoot are in mint condition.
Other than product preparation, make a list of items you want to shoot and how you want to shoot them. Without a written shot plan, you can easily skip some items or any desired angles. Also, if you will use any kind of props during your photoshoot, such as flowers, to warm up your images, include them in your written list. When missed poses and angles are noticed after the shooting, they are highly likely to be excluded from your online shop entirely.
Don’t forget to gather your pieces of equipment before the shooting, too. Prepare your lights, background and surface materials of choice, tripod, and reflectors. Also, don’t worry if you don’t own a high-quality professional camera. Any DSLR camera will be more than enough to do the job, or even an iPhone can create satisfactory results. So, equipment-wise, e-commerce shooting is one of the least demanding and available types of photography.
Setting the background
If you have done any online shopping, you might have noticed that many products are pictured before a white background for a clearer view of the item. That’s exactly what you are going for in this process; a clearer image. First of all, you will need a smooth background material. Photo shooting tents and boxes will be perfect for this, but any monochrome fabric will also be okay if you are looking for a budget and quick alternative. Regarding the colour of the background, white is always the safest option since it clearly highlights the product placed before. But if you avoid neon or overly bright, saturated colours, you can consider other colours to shoot your product with. While choosing this colour, taking the colour of your online shop’s website or application’s theme colours into consideration can help you create a unified style and a pleasant look overall.
Also, some products like furniture or decoration items can look the best in their common positions. For example, shooting a table or chair in a plain background might mislead your customers since it will be harder to comprehend the product’s size and shape. So, to provide your customers with a better understanding and creative ideas about your product’s placement or use cases, include some photos with regular backgrounds, too.
Finding the perfect lighting
Generally, a natural light source provides the best outcome when it comes to product photography. But most of the time, it might not be possible to do outdoor shooting using the sun as your light source. In that case, your camera’s flash will do just fine too. But there are things you need to consider when using an artificial light source. First of all, direct light generally creates undesired reflections on products with glossy surfaces like leather shoes or clothes, glass products, products with screens, etc. So, you need to soften your light with a softbox, diffusion paper, or an umbrella. Below, you can see what a fully-equipped fashion photography lighting setup looks like.
Using a direct light source can also lead to unwanted shadows to appear in your photographs. You can always edit the shadows later in your post-production process, but using a diffuser also helps with distracting shadows since a diffused light source does not produce shadows as clear as a direct one does.
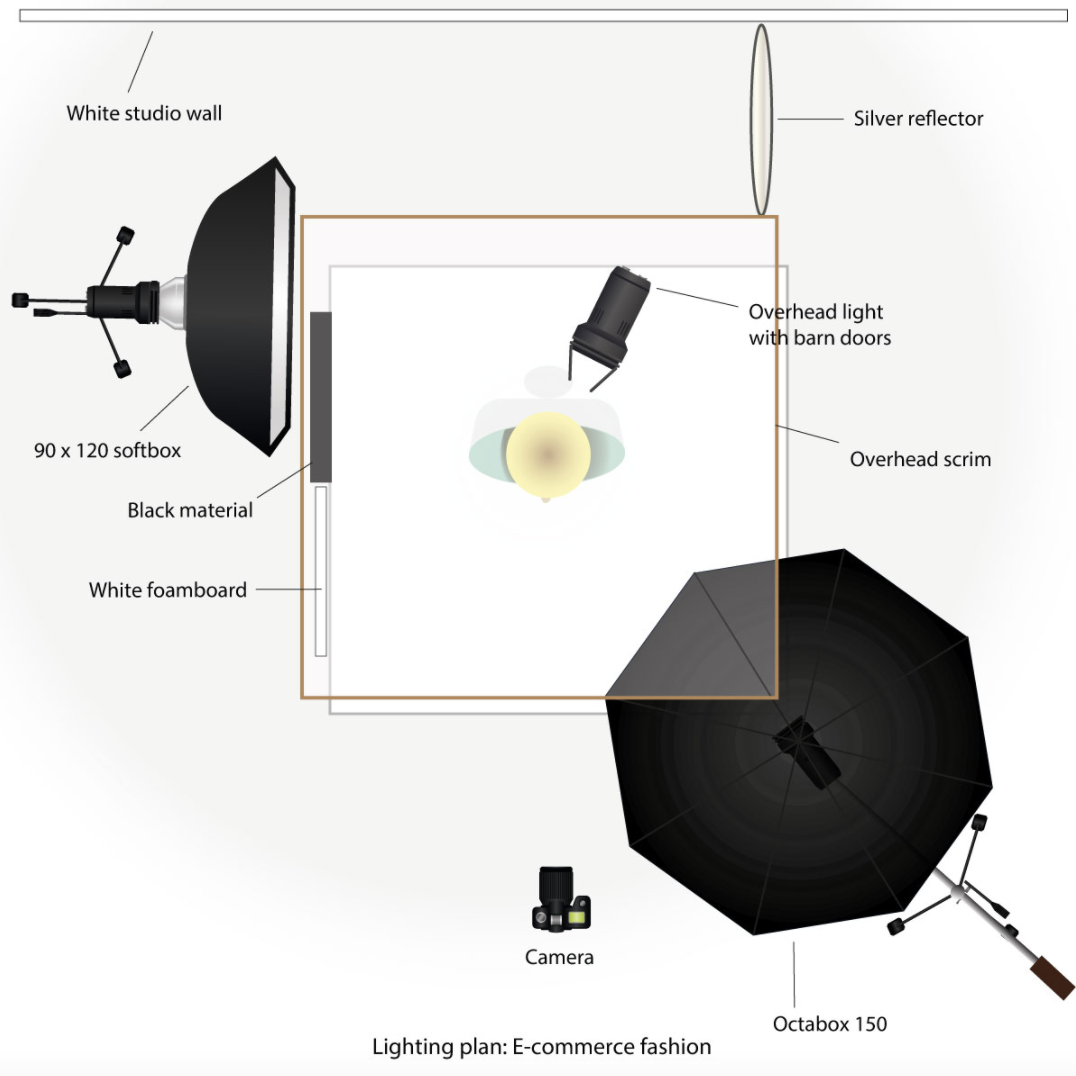
Source: Karl Taylor Education
Taking the pictures
After you do all the preparations, decide on your background and set your lighting; taking the photos is the easier part. There are things to consider, of course, but it’s a straightforward process. Start by shooting the items that you have written down as a list. During the process, occasionally check the photographs. If possible, transfer them to a device with a bigger screen and ensure that the positioning, lighting, and background works with your product. Don’t forget to take pictures from various angles since it helps customers get a thorough look at your product before they decide to buy it. You can even shoot a 360° photograph by slowly relocating your product before a plain background. Also, when shooting items with little details like jewellery or accessories, don’t forget to include some close-up pictures that display all details of your product.
Post-production
Even if you perfectly followed your plan and did a seamless photoshoot, your pictures probably will need a retouch before you finish. Correct overly bright colours, adjust the exposure, check for any out-of-focus images or anything that might distract the viewer, and resize your photographs so you can use them together in your e-commerce app or website. While editing the colours of your photos, bear in mind that creating a unified look among your photographs will appear more professional. So, try not to overdo any colour editing and try to achieve similar feels in your photos.
Expand your e-commerce journey with Mowico
You learned how to do a photoshoot for your e-commerce products, now it’s time to evolve your business into something bigger. M-commerce is decisively moving towards being the #1 source of online shopping, so why not be a part of this trend? With Mowico, you can transfer your e-commerce to a mobile application in just mere hours. Be it an e-commerce platform or a custom infrastructure, Mowico easily moves your business into a mobile app thanks to its compatibility with more than 35 e-commerce platforms. After the transfer, you can easily modify your app as you like with Mowico’s drag-and-drop interface, and add features like push notifications, loyalty points, in-app messaging, wishlist and many many more. Visit our website, explore all features of Mowico, and accelerate your e-commerce journey now!